web 2.0

Friday, March 18, 2011

Final Version Of Internet Explorer 9 (RTM) Available for Download

After the release of Internet Explorer 9 RC version on February 10, 2011 finally Microsoft has launched the Final version of Internet Explorer 9 for Windows 7 and Vista operating systems, which you can download from the Beauty of the Web site. Microsoft has decided to drop the support for Windows XP with IE 9 even though XP still has a 55% of market share.

While it may be hard for Microsoft to convince users of Google Chrome and Firefox to make the switch to new Internet Explorer version 9 but there is definitely a significant improvement, both in terms of features and speed, over any of the previous releases. IE9 is a complete rebuild of Microsoft’s popular browser. The improvement in browsing speed, graphics, tabbing, pinning, HTML5 and hardware acceleration are some of the main features of the new Internet Explorer 9.

Microsoft revealed earlier this month that users have downloaded 36 million copies of Internet Explorer 9 since its beta release in September. If you already have the Release Candidate or Beta versions installed, the RTW (release to world) build will be offered via Windows Update. If you don't have the RC or Beta builds installed, you'll have to download it manually.

My Last Words:-

The new internet Explorer 9 is really a good browser with lots of new features and has a very attractive interface as well. Incase you missed, do read Internet Explorer 9 Keyboard Shortcuts, which is quite a handy post. It’s always recommended to have 2 browsers installed in your computer. Incase your primary browser is not working, you can use the other one. Atleast give it a try and then share your comments and suggestions at below page commenting section.

Download New Internet Explorer 9

Recover Your Deleted Files Folders With Help Of Free Software

We makes lots of mistakes while working on computers. And some times these mistakes costs us lot of problems as well like accidently deleting some important files and folders. But what if their is a solution to this problem at NO COST. Ofcourse their is!!! (This doesn’t mean that now you can delete your brother secret folders :P) Although there is an option in every windows that the deleted files goes to the Recycle Bin. But unfortunately it doesn’t work for external USB drives, USB flash drives, memory sticks, or mapped drives. Files deleted from these drives doesn’t go into the Recycle Bin. But no worries, i have a solution for this.

Recuva (pronounced "recover") is a freeware Windows utility, which you can use to restore files that have been accidentally deleted from computer. This includes files emptied from the Recycle bin as well as images and other files that have been deleted by user error from digital camera memory cards or MP3 players. It will even bring back files that have been deleted from your iPod, or by bugs, crashes and viruses!

Softwares Feature List:-

  • Simple to use interface - just click 'Scan' and choose the files you want to recover
  • Easy to use filter for results based on file name/type
  • Simple Windows like interface with List and Tree view
  • Can be run from a USB thumb drive
  • Restores all types of files, office documents, images, video, music, email, anything.
  • Supports FAT12, FAT16, FAT32, exFAT, NTFS, NTFS5 , NTFS + EFS file systems
  • Restores files from removable media (SmartMedia, Secure Digital, MemoryStick, Digital cameras, Floppy disks, Jaz Disks, Sony Memory Sticks, Compact Flash cards, Smart Media Cards, Secure Digital Cards, etc.)
  • Restores files from external ZIP drives , Firewire and USB Hard drives
  • It's fast, tiny and takes seconds to run!
Learn How to Restore Deleted Files (Step By Step):-

1. I will recommend every user to download Portable version of Recuva, (In that case you don’t have to install it in your PC, just run the software from USB)

2. Once downloaded, extract the zip file on your computer (if you downloaded the portable version) or Run the installation by double clicking the file.

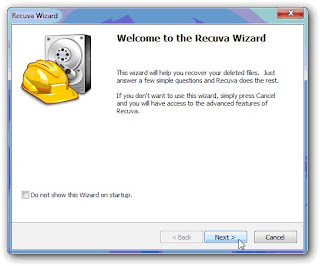
3. After installing it in your pc, double click its icon and you will see the software screen as shown in below screenshot
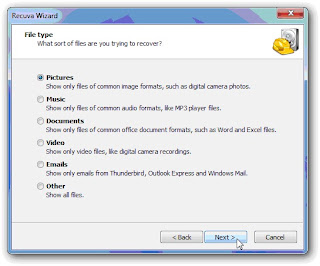
4. Select the type of file you want Recuva to search for. You can select the last option which is “other” which will show all of the deleted files but by selecting a particular file type will save a lot of time and make it easier to find what you are looking for. After selection, Click “Next

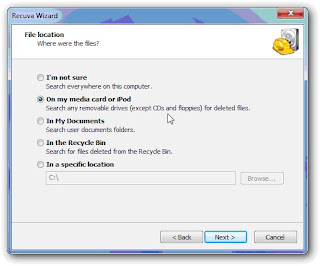
5. Now you have to specify where the file was, which will obviously be up to wherever you deleted it from. After selecting the location, Click “Next
6. The next page will ask you whether you want to do a Deep Scan. My recommendation is to not select this for the first scan, because usually the quick scan can find it. You can always go back and run a deep scan a second time. Click “Start

7. And now, you’ll see all of the files deleted from your drive, memory stick, SD card, or wherever you searched. Just right click any file and select “Recover Highlighted” or tick mark the files which you want to recover and then Recover multiple files all at once.


If you are confused with the large number of results, then you can switch to advance view where you can sort the results by the last modified time, so you don’t have to look through quite as many files.

My Last Words:-
Recuva is really a life saver. People who have faced such situations in past when they deleted some important files, know the importance of such softwares. It’s a Freeware Portable software, which i recommend to every pc user to have it. Do post your suggestion about this software and if you have any other software to recommend, then do post it at below page commenting section.

To Download The Software : Recuva

Change your Operating System Looks And Features The Way you Want

We love to mess up with our operating systems a lot. We like to change the way Windows looks and works by doing some manual settings or by making the changes in the registry settings. But that also requires a bit of technical skills. What if their is THE… and i mean … THE SIMPLEST SOLUTON to make the changes in your operating system just by TICKING IT AT THE CHECK BOXES. Well yes.. you can do that and many other things with the help of a Windows Tweaking Software name “True System Security Tweaker

We love our brothers, sisters and kids but we also love our computers a lot. We don’t want people to mess up with our running computers to make it act like a zombie. With the help of this software, you can simply hide / disable the options which you don’t want others to see. You can define access level to lots of Control Panel applet functions including Desktop, Network, Passwords, Printers, System, Add/Remove Programs, etc.

List Of Features

  • It doesn’t require any kind of Installation. Simply download it and Use it without any kind of Installation WOW!!!
  • You can change approx 470 security options
  • You can put the password on the software, so that no one else can open it and make the changes.
  • If you made so many changes and want to revert it back, a simple click will revert your pc to the previous stage.
  • Guess What….. IT’s FREE!!!

System Requirement

You can use this software on Windows XP, Vista and Seven. You can also use it on Server 2000, 2003 & 2008

My Last Words:

This portable software is so easy to use and it’s not complicated at all. Its simple interface makes it more easy. Use it and then share your comments about it at below page commenting section.

Download The Software : True System Security Tweaker

Identify Your Startup Services Online - Website of The Week

If you're frustrated with the time it takes your Windows PC to boot and then it seems to be running slowly you may have too many programs running at start-up. This thing happens with every user. You like to install different softwares on your PC. These softwares then put their files in the start-up area of your computer. So when ever you Start you computer, those softwares also gets load which are not even required.

For example, everyone use MSN messenger but do you really have to make it auto start when ever you start your computer. If yes, then it’s your choice but don’t complain that your computer is taking time while you turn it on. Like messengers, there are many other services which starts up automatically and makes your computer runs sow. You can solve this problem by just identifying and disabling these unwanted programs from your startup list. But the problem is, how you will identify which service should be disabled and which shouldn’t.

The sysinfo.org provides a comprehensive and accurate list of startup items, which can help you identify what these programs do. This way you can be sure if they are safe to disable or not.

How to Find a Service See Below:-

1. Click on your start menu and then click RUN

2. Type “msconfig” and press enter

3. Go to Startup Tab and you will see all the services which are tick marked are the one which your computer is loading at the time of startup

4. Now Let say from above screenshot, i don’t know what is “fpplock service”.

5. Open the sysinfo.org site and you will see a search box in the middle of the page. Just type the service name and click “Search” button

6. You will see your search results similar to below screenshot for your service. From their, you can easily identify that service and can then take an appropriate action.

Note: Before doing any thing related to windows services, Make sure that you know what you are doing and be careful while you make any changes.

My Last Words:

The site sysinfo.org keep itself updated and It’s really a helpful site for system administrators and desktop admins. Normal users can easily troubleshoot their pc with the help of this site and can disable those services which are making their computer work slow. If you have any other solution to get more details about the startup services, then do share it with us at below page commenting section

To Visit The Site : sysinfo.org

Thursday, March 17, 2011

Increase Your Online Storage Space - Dropbox Quiz

There is a news from Dropbox (online storage service provider) that by solving their online quiz, your online storage space will be increased instantly by 1GB, which none of you should miss it as it’s available only for a limited period.
Many of you would not be knowing much about it. But right now that’s not important because in my next post i will explain each and everything which is related to the Dropbox, Right now you should rush to the site by Clicking Here and make an account. After that follow below steps where you can see the link to the page where the online quiz is hosted and for your convenience and for your help i have provided you the links of the pages where you can find the answers to those questions as well.
To those who still insist to have a briefing on the Dropbox first so that they will have an idea atleast that what are you going to do and why you really need to have an account at Dropbox please find below briefing and after that you can see the link to the quiz page and the links to the answers as well.


So What is Dropbox
If you want to have an online storage space or should i say a small and smart USB, then look no further than Dropbox, an ingenious tool for storing and sharing files between all of your computers and with your friends or even with strangers (don’t worry for strangers, you will put the password on the files or folders). Initially the site gives you 2GB of free space and if you refer to your friends to make an account then your online storage can be increased upto 8GB. Which every1 should have it especially at Dropbox which is really a smart site.

Ok, So What’s Are The Steps

First you have to create a Free Account and to do that Just Click Here. After creating an account, you have to download a very tiny utility from site and once it’s installed, a Dropbox folder appears on your computer’s desktop or where ever you want.

Now if you are using multiple computers like 1 at office, 2nd at home and 3rd another laptop then you have to install Dropbox software on each computer in order to share the files among all these three computers. After that Just put those files into the folders which you want to synchronize among all of your computers and they will automatically appear in the Dropbox folder on each one of your computers, laptops and smartphones.

What’s more, every file which you put in that folder is automatically added to another Dropbox folder at the Dropbox website, which is accessible from any computer in the world. And if you want to share the same files with your friends than Invite your friends to access your Dropbox folder, for quick and easy file sharing. You can also make a public folder which would not be having any kind of password and can be accessed by any1 without even creating an account at Dropbox.

In my next post, i will explain in detail that how you can take the maximum advantage of the Dropbox but for now it’s enough. Now follow below steps to increase your online storage space by 1GB by taking a participation in their online quiz

Finally….. Let’s Talk About Dropbox Quiz

1- After creating an account, you can Click on this Link in order to open the quiz page – Click Here and then at the below page their is a link GET STARTED. Click on it and your first question will appear

2- I recommend first that you should solve the puzzle on your own in order to enjoy the show otherwise what is the fun.

3. And if you simply give-up, Then here are the links to those pages where you can find the answers to the questions.

Just open all the above sites and take help from it. But please note that the answers are not so easy to understand. You have to use your own mind as well :) Enjoy

My Last Words:-
So did you give it a shot? Did you make an account? Did you answer to the questions? Do post your wall of fame position at the below page